


My Crochet Under The Sea Playbook Part Five – Free Crochet Along
My Crochet Under The Sea Playbook Part Five is part of a six-page, fun crochet sea themed playbook.
Each page is uniquely sea, beach themed. Includes a cute, little mermaid and friends.
Possibilities for lots of accessories and extras.

For more information about this crochet along CLICK HERE!
My Crochet Under The Sea Playbook Part Five
PATTERN SUPPORT
- Full pattern support is available from the Joanita Theron Designs Facebook Group or/and Joanita Theron Designs Ravelry Group.
- Please post a question in the group and remember to TAG me! I will assist as soon as possible or one of my members will gladly jump in to help!
- For questions relating to permission or usage email joanita@creativecrochetworkshop.com
Abbreviations: US Terminology
CH – chain
SL ST – slip stitch
SC – single crochet (UK – DC)
HDC – half double crochet (UK – HTR)
DC – double crochet (UK – TR)
TR – treble crochet (UK – DTR)
BLP – back loop
RS – Right side
WS – Wrong side
For more information about this crochet along CLICK HERE!
PART FIVE:
Instructions:


ROW 2-5:DO NOT CH 1 AT THE START OF EACH ROW WHEN TURNING –Work 1 SC into each ST (5 STS);
DO NOT TURN AFTER LAST ROW, SL ST INTO EACH ROW DOWN THE SIDE;
SL ST INTO NEXT 3 STS;
ROW 2-5:DO NOT CH 1 AT THE START OF EACH ROW WHEN TURNING –Work 1 SC into each ST (5 STS);
DO NOT TURN AFTER LAST ROW, SL ST INTO EACH ROW DOWN THE SIDE,


Medium Piece – Make 2
CH 16
ROW 1: Work 1 SC into 2nd CH from hook, work 1 SC into each CH until end (15 SC), TURN
ROW 2: CH 3 (counts as 1 DC), work 1 DC into each SC until end (15 DC), TURN
ROW 3-9: CH 3 (counts as 1 DC), work 1 DC into each ST until end (15 DC), TURN
ROW 10: CH 1, work 1 SC into each DC until end (15 SC)
DO NOT TURN – work 2 SC into each row down the side;
work 1 SC into each foundation CH;
work 2 SC into each row up the other side;
DO NOT CH1, but work 1 SC directly into the first SC of Row 10
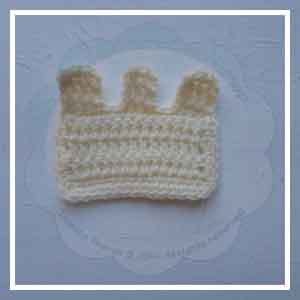
First Tower:
ROW 1: work 1 SC into next 3 STS, TURN
ROW 2-5:DO NOT CH 1 AT THE START OF EACH ROW WHEN TURNING –Work 1 SC into each ST (4 STS);
DO NOT TURN AFTER LAST ROW, SL ST INTO EACH ROW DOWN THE SIDE;
SL ST INTO NEXT 2 STS;
Second Tower:
ROW 1: Work 1 SC into next 3 STS:
ROW 2-5:DO NOT CH 1 AT THE START OF EACH ROW WHEN TURNING –Work 1 SC into each ST (3 STS);
DO NOT TURN AFTER LAST ROW, SL ST INTO EACH ROW DOWN THE SIDE;
SL ST INTO NEXT 2 STS;
Third Tower:
ROW 1: Work 1 SC into next 4 STS:
ROW 2-5:DO NOT CH 1 AT THE START OF EACH ROW WHEN TURNING –Work 1 SC into each ST (4 STS);
DO NOT TURN AFTER LAST ROW, SL ST INTO EACH ROW DOWN THE SIDE,
Fasten off and weave in ends
Small Piece – Make 3
CH 16
ROW 1: Work 1 SC into 2nd CH from hook, work 1 SC into each CH until end (15 SC), TURN
ROW 2: CH 3 (counts as 1 DC), work 1 DC into each SC until end (15 DC), TURN
ROW 3-4: CH 3 (counts as 1 DC), work 1 DC into each ST until end (15 DC), TURN
ROW 5: CH 1, work 1 SC into each DC until end (15 SC)
DO NOT TURN – work 2 SC into each row down the side;
work 1 SC into each foundation CH;
work 2 SC into each row up the other side;
DO NOT CH1, but work 1 SC directly into the first SC of Row 10
ROW 1: work 1 SC into next 3 STS, TURN
ROW 2-5:DO NOT CH 1 AT THE START OF EACH ROW WHEN TURNING –Work 1 SC into each ST (4 STS);
DO NOT TURN AFTER LAST ROW, SL ST INTO EACH ROW DOWN THE SIDE;
SL ST INTO NEXT 2 STS;
Second Tower:
ROW 1: Work 1 SC into next 3 STS:
ROW 2-5:DO NOT CH 1 AT THE START OF EACH ROW WHEN TURNING –Work 1 SC into each ST (3 STS);
DO NOT TURN AFTER LAST ROW, SL ST INTO EACH ROW DOWN THE SIDE;
SL ST INTO NEXT 2 STS;
Third Tower:
ROW 1: Work 1 SC into next 4 STS:
ROW 2-5:DO NOT CH 1 AT THE START OF EACH ROW WHEN TURNING –Work 1 SC into each ST (4 STS);
DO NOT TURN AFTER LAST ROW, SL ST INTO EACH ROW DOWN THE SIDE,
Fasten off and weave in ends

Roof – Make 2
CH 11
ROW 1: Work 1 SC into 2nd CH from end, work 1 SC into each CH until end (10 SC)
ROW 2: CH 3 (counts as 1 DC), work 1 DC into each ST until end (10 DC)
ROW 3: SC2tog, 1 SC into next 6 STS, SC2tog
ROW 4: SC2tog, 1 SC into next 4 STS, SC2tog
ROW 5: SC2tog, 1 SC into next 2 STS, SC2tog
ROW 6: SC2tog x 2
ROW 7: SC2tog, CH 1 – SL ST all around roof
Fasten off and weave in ends.


Door – Make 2
Make a magic circle
Work 9 DC into ring – continue along the bottom and work 2 SC into around the 2 DC at the bottom, TURN;
work 4 rows of SC (4 SC per row) – SL ST all around door
Fasten off and leave a tail for sewing


Sew each door onto the medium pieces 🙂


The DC stitches are used as ‘button-holes’ !

Build your own Sandcastle!
COPYRIGHT ©
- The pattern or any portion of it may not be reproduced or used in any manner whatsoever without the express written permission of the designer.
- No video tutorials allowed without the express written permission of the designer (no exceptions).
- The design, pattern, and all images are the property of Joanita Theron Designs/Creative Crochet Workshop.
- The purchaser (whether free or paid) of this pattern may use it for personal use and/or charity.
- Sales of the finished items (made by you and not commercial in quantity or production) are encouraged, and credit given to the designer would be most appreciated.
Please respect the amount of time, effort and love that goes into the designing of each of my patterns, and even if they are for free, please send your friends the link and do not send them the pattern.

Discover more from Joanita Theron Designs
Subscribe to get the latest posts sent to your email.
Hi Roxanne 🙂 Yes it is the right doll! I will be giving the mermaid tail and her accessories separate!
I couldn’t find a Mermaid Doll at the link you gave. It was a storybook doll for a doll house. Is this the right doll in that we will be using it as our mermaid? Will you give directions for a tail for her?
I enjoy your Creative Workshop. This gives kids a chance to create and use their imagination.
Your new site is great.
Thanks